Japan Transit Apps

Hi everyone! Today I’ll be talking about an absolute lifesaver for living in Japan, transit apps. It was only my second or third day here that my host mother told me I wouldn’t survive without Yahoo Transit and, she was right. I’m going to go in depth about the two I use most often, Yahoo Transit and Jorudan, as well as quickly gloss over Google maps. All of these apps are available on Android and iPhone, and have desktop versions as well!

Google Maps:

I would be lost constantly without google maps, I frequently use it for walking directions. But, when it comes to timetables, at least in Japan it severely falls short. I was on a weekend trip with a friend who had done most of the planning and she was giving me options for our train the next day; saying there were only two options before having to wait several hours. That didn’t seem right to me, so I double checked on Yahoo Transit and sure enough, there were a lot more trains available. When it comes to making transit plans, I don’t recommend it.

Yahoo Transit and Jorudan

According to my host mom, Yahoo Transit is on every Japanese phone, nobody lives without it. I can’t speak for the accuracy of that statement, but it sounds pretty reasonable to me. Between this and Jorudan, I find Yahoo to be much more user-friendly despite the biggest catch:
screenshot_20190416-074000

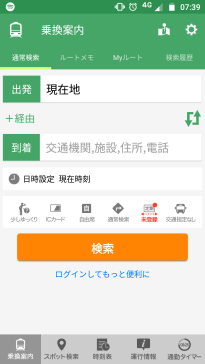
It’s entirely in Japanese. This might not be the worst for someone trying to learn the language, but I’m sure it puts a damper on things if you are not. Not only is it in Japanese in terms of reading, but the search function doesn’t understand roman characters, so you need a Japanese keyboard installed to input stations names as well. The functions are very straight forward though, and easy to navigate if you understand them.

Okay, maybe I haven’t convinced you. That’s fine, that’s why I also like Jorudan.
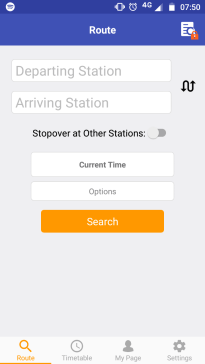
screenshot_20190416-075036

Unlike Yahoo, this app is entirely in English and on the surface looks pretty much the same. Let’s do a quick search to highlight the differences. I’m going to do the same search from Nagoya to Kyoto with both of them, and set the time to arrive at noon, today. It just so happens that the main stations in Nagoya and Kyoto are called Nagoya Station and Kyoto Station, so that makes this search easy. To Google map’s credit, if you’re, for example, trying to get to a movie theater on the other side of the city and don’t know which station you should go to, it can tell you that information and help you figure out where you need to go. These apps can only tell you how to go where you know you want to. Anyway, let’s hit search on both these apps.
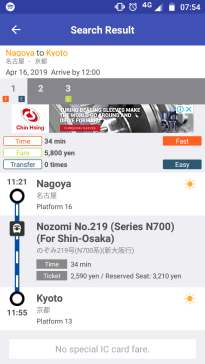
screenshot_20190416-075427

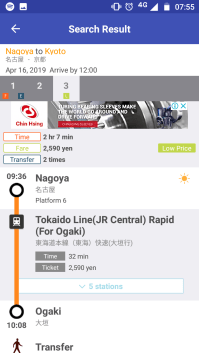
When you search with Jorudan, it has the option numbers listed towards the top, as you can see here it’s given three routes. The orange, blue, and green boxes you see are shorthand for fastest time, easiest route (least amount of transfers), and cheapest ticket. The default settings have it organized by fastest time, but you can change this. If you click on the different numbers it will show the details of all three route options.
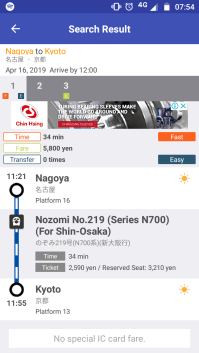
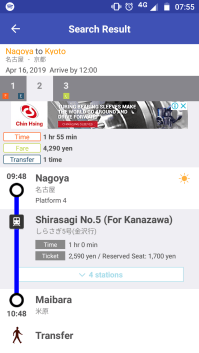
screenshot_20190416-075427-1     screenshot_20190416-075510     screenshot_20190416-075521

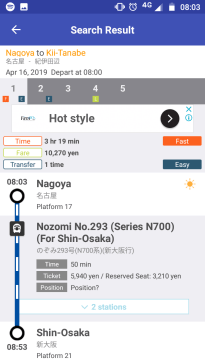
As you can see, each route provides information in regards to departure and arrival time, cost, which platforms you get on and off at, and an expandable list of the station names that come before your stop. A quick note, if you’re searching on the Jorudan website, it will not include the platform numbers, and say that such information is available for paid members. Don’t fall for this, as the information is right there on the app version. Knowing your platform numbers in advance is super helpful, especially when transfers are involved.

Alright, let’s move on to what Yahoo has to offer and then further compare the two.
screenshot_20190416-075921     screenshot_20190416-075925

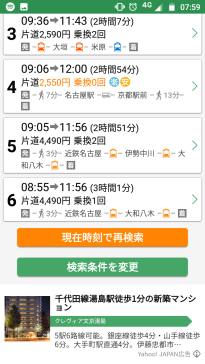
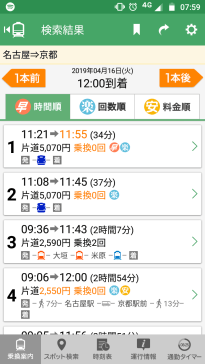
Now, this is the same exact search parameters as with Jorudan, and already you can see not only the app’s formatting is extremely different, but also the search result has been doubled. This result screen gives a quick breakdown of the different routes, times, costs, transfers, and with the pictographs you can tell if it’s a shinkansen (1 and 2), above ground trains (3, 5, and 6), or even a bus (4). This app also uses the same shorthand as Jorudan, with orange, blue and yellow circles representing fastest time, easiest route, and cheapest ticket.
screenshot_20190416-080003

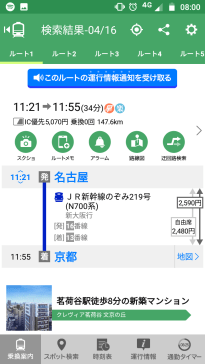
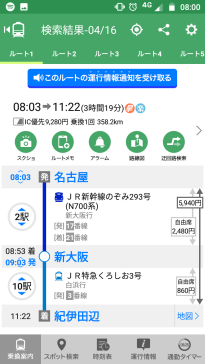
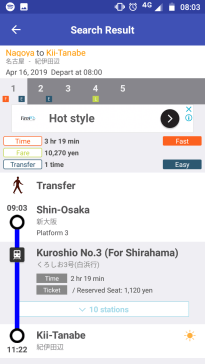
Clicking an option gives you further details such as platform numbers, train names, an expandable list of stations before your stop, and ticket information. The arrows represent what part of the route a certain ticket covers. Here’s a different search for a better example of this.
screenshot_20190416-080042

If you read my How To Ride The Shinkansen post, you know about fare and seat tickets. The yen amount that has arrows from top to bottom is the fare ticket, the other two are the seat tickets. Jorudan does a similar thing, but the formatting looks more like easily missed fine print so be careful and always refer to the fare listed at the top.
screenshot_20190416-080305     screenshot_20190416-080315

You may have noticed by now that the fares between these apps for the same searchers are a little different. That’s because although I made the times the same, I was searching on the default settings. Yahoo uses a default of unreserved seats and Jorudan uses reserved seats. Reserved seats are a little more expensive because you are guaranteed a seat, whereas you may be left standing if you have an unreserved ticket.

And that’s it! These apps are pretty straightforward. I have a preference for Yahoo because of the way it shows a summary of all the search results and is more flexible in the options it gives, but honestly, they’re both fine and will help you get to where you need to go! Also, with these apps, you can input future dates and times, to plan for trips. I used them to figure out my entire trip to Wakayama almost two months in advance. I hope someone found this helpful, happy travels!
 

How to Ride the Shinkansen

Last week, I rode the shinkansen, Japanese bullet train, for the first time. I figured it would be a pretty straightforward process, and it is, but there are definitely a few things that I wish I knew in advance. Actually, just one thing. And then a bunch of other things I had to google in order to have the knowledge in advance. So, for anyone else searching for that knowledge, here’s my take it on it.

Before I dive in, this is going to be about buying tickets in Japan and how to use the tickets. For those coming from overseas just to sightsee, you have the option of purchasing a Japan Rail Pass. The exact price varies depending on location and how many days, with the average being around 200 USD for seven days. These passes are through the different JR (Japan Rail) companies and cover almost all JR trains and buses (note that city subways are NOT operated by JR). My one-way shinkansen ticket from Nagoya to Shin-Osaka was almost 6000円 (~$55), so if you’re planning cover a lot of ground it definitely is worth it! More information can be found here.

Buying a Ticket:

This is one thing I researched myself, and the advice I’m about to give is contrary to what I found others suggesting. However, I am of the opinion that the easiest way to buy a shinkansen ticket is at a machine and not at a counter with a person. Especially if you do some prior planning with a Japan transit app. The main reason that I found other people recommending going to a person is because of “how confusing” shinkansen can be, but I would like to dispel this rumor. There are only three simple things you need to know before approaching a ticket machine:

1) Names of shinkansen:

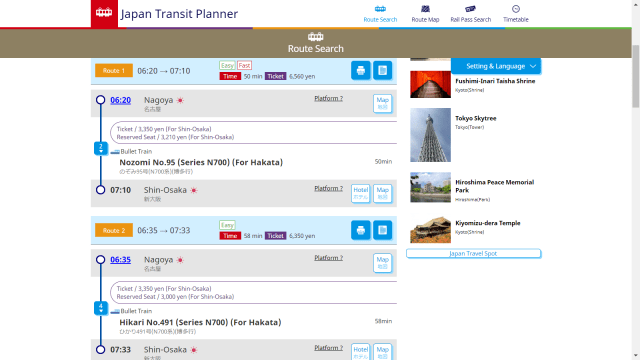
When using a transit planner you’ll see something like this:

Screenshot (39)

As you can see, both of these options are on a bullet train, but one of them says “Nozomi No. 95” and the other says “Hikari No. 491”. Depending on where you’re going, you may see a variety of other names, but the difference remains the same: speed and price. If you compare the two, the Nozomi train makes two stops less and gets in 23 minutes earlier. If you want a reserved seat it’s 210円 more, but non-reserved seats are the same price for both trains.

2) Seats:

Seats come in three kinds: reserved, non-reserved, and green car. Reserved means just that, you reserve an actual seat and are guaranteed to sit in it. Non-reserved means that the seats in that cabin are first-come-first-served, and you might end up standing. These tickets are the cheapest. Green car is code for first class, where there is more room per seat and fewer people in general, but the difference in price can be 2-3000円 more.

3) Do you want to ride in a smoking or non-smoking car?  

Once you know what ticket you want to buy, approach a shinkansen ticket machine. These can be found in any train station where you can board a shinkansen, and even some bigger stations where you can’t, for example, there’s a couple in Nagoya’s Kanayama station. At a shinkansen ticket machine, you can, of course, buy shinkansen tickets, but also transfer tickets to JR limited express trains. These are a little nicer than your average JR train and require an additional seat fee. Much like shinkansen you can buy a reserved or unreserved seat. I mention this because when I bought my ticket I also bought a transfer ticket for a limited express train. Once at the machine, there’s a button on the top right of the screen to change the language. You’ll then be given the choice of searching for a reserved shinkansen ticket, a non-reserved ticket, or to purchase tickets using a route search. I believe if you search for a reserved or non-reserved ticket you will be asked if you want to buy a transfer ticket as well, but I just chose to use the route search. With that option, you input the starting station and final station – for me, this was Nagoya and Kii-Tanabe – dates, and time. It will then show you some itinerary options, pick the one that works best for you, or if you’re using a transit app, matches that itinerary. Pay with a credit card or cash and receive your tickets!

You will always receive at least two tickets, there will be more if you bought transfer tickets as well. One of these will be your “ticket”, which is the cost of getting from point a to point b. My ticket read Nagoya to Kii-Tanabe. The other ticket(s) is your seat ticket, this is the cost of being on the train. Because I transferred, I had two separate seat tickets, one for a shinkansen from Nagoya to Shin-Osaka, and one for a JR limited express from Shin-Osaka to Kii-Tanabe.

Riding the Shinkansen:

This is the part that messed me up on my travels. It’s super straight forward if you know what to do, but if you don’t then a ticket machine will yell at you. And the businessmen trying to have an easy commute will be annoyed at you when you have to push past them to ask a station attendant why you can’t get through.  

Anyway, what you do is you take your ticket, and your seat ticket, and put them stacked on top of each other into the ticket machine. Now the gates will let you through and spit the tickets out on the other side, where you collect them. Then, as you exit at the end of your trip, just repeat this process. Unless you’re transferring, then you add your new seat ticket onto the pile and put all three into the machine, this time it will only spit back your new seat ticket and fare ticket.

As for actually riding the shinkansen, find either the car number your reserved ticket corresponds to or a car marked “non-reserved.” If you do have a non-reserved ticket, I recommend arriving early so that you can be near the front of the line and have a better chance of getting a seat. The seats have a very large amount of legroom, designed for anyone traveling with a large suitcase to be able to fit that in front of them. If you’re not traveling with one, enjoy the room!

And that’s all! Happy travels!